Hey! Let’s have a look on how to create a UserControl. It is you custom element you can reuse in HMI. That thing which is called Frame in the old TF1800 Visualization or Faceplate in Siemens.
Requirements
- You should be able to work with PLC stuff
- You should be able to create and deploy HMI project. Here is a link to the basics tutorial for the HMI!
What you should expect form this article
- Create UserControl element
- Add parameters
- Connect parameters to controls in the UserControl in various ways
- Learn to add FBs as datatypes to HMI
- Make UserControl do something
- Use the UserControl
- The article may seem long but there is a lot of pictures and actually just a few things to do
- This article was made with HMI version 1.12.760.54. Other versions of HMI was and probably will be same or very similar
Table of Contents
- PLC program – Have something to control
- Create usercontrol
- Layout
- Add parameters
- Make UserControl work!
- Use it!
- It looks ugly AF
- Final word
- Example file
PLC program – Have something to control
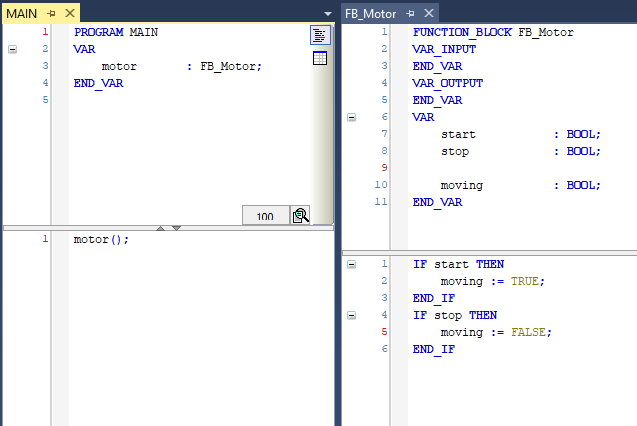
Before everything else, let’s have some PLC program we can use to actually control something with the HMI.
*For the sake of easiness I will straight mess with internal variables of FB. Which is not a good practice I would say.
So here is the PLC program we will use:
Create usercontrol
It’s said the first steps are the hardest ones. This one is actually the easiest one.
First of we will create folder to have files properly organized. So let’s create folder UserControls in the project tree. You should be able to pull up this one on your own pal.
Now right click that folder -> Add -> New Item… and the window Add New Item will pop up. Here you just obviously select User Control and give some name to it. I will name it MotorControl.usercontrol.

Layout
This step does not include anything new you wouldn’t know from the HMI tutorial.
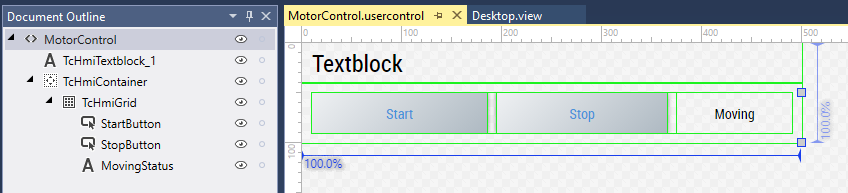
We will drop to the workspace following controls:
- 2 Buttons to control start and stop variables
- 2 TextBoxes. One for header and one will serve to show status of moving.
Make some nice layout. This is mine:
*Don’t be afraid to add some spacing between controls. Working with space is one of the things that make things look good.
*Take a look into Toolbox category System and play with Container and Grid. These will help you to make well organised and responsive layout.
Notice how I have strategically named Buttons and status TextBlock. These will come in handy later.
Add parameters
Now we are getting to something new!
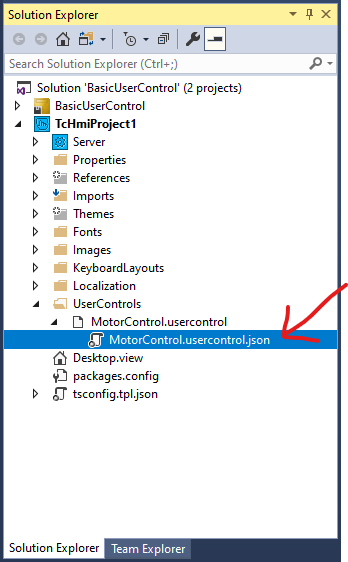
We will open Edit/Define Parameters window. You can open the window using these two ways:
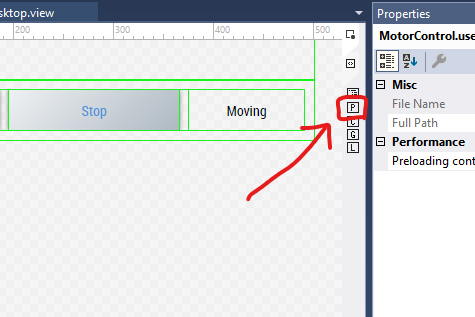
Either by clicking little P button on the side of the editor or by opening json file inside your UserControl in the Solution Explorer.
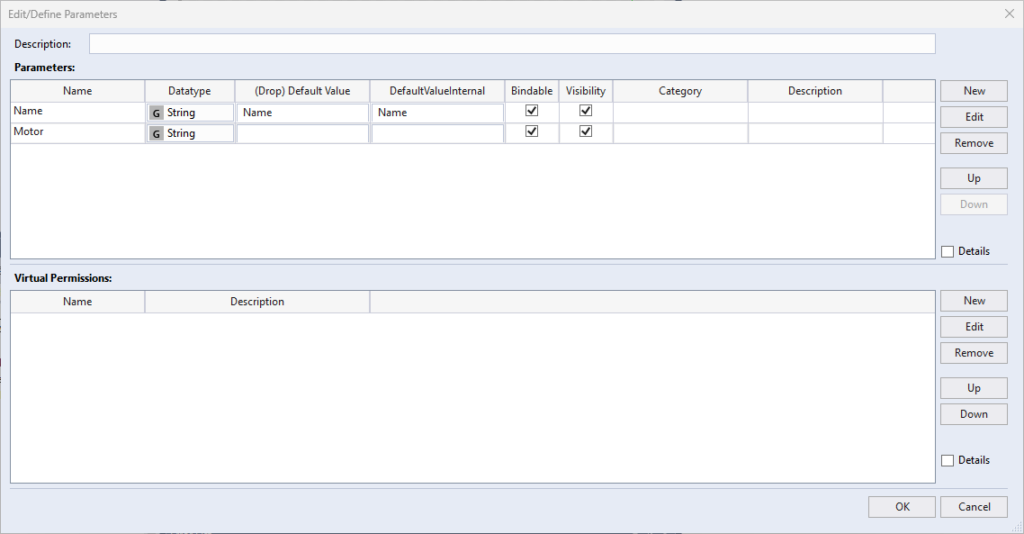
We can now add parameters. It is easy. Just click the New button on the right and new row for parameter will appear. Here is what each individual column means. Name and datatype have to be configured. It is very useful to have drop and internal values filled too (picture bellow).
- Name – Name.
- Datatype – You can choose from many datatypes here. If we want to use datatype from PLC like FB or structure we have to add the datatype first. This will be show in the next paragraphs.
- (Drop) Default Value – This is default value when configuring usercontrol instance.
- DefaultValueInternal – This value will be shown while editing the usercontrol.
- Bindable – This will restrict binding of any symbol to this parameter when configuring usercontrol instance. i.e. you will not be able to use that black dot on the right of parameter. You can only fill in constant value.
- Visibility – Parameter will not be visible when configuring usercontrol instance. You may want to use it when creating internal variables of usercontrol.
- Category – This will sort parameters into categories as you can see in the Parameter window. If you write name of existing category it will be added in there.
- Description – This text will show when you hover with mouse over the parameter name when configuring usercontrol instance.
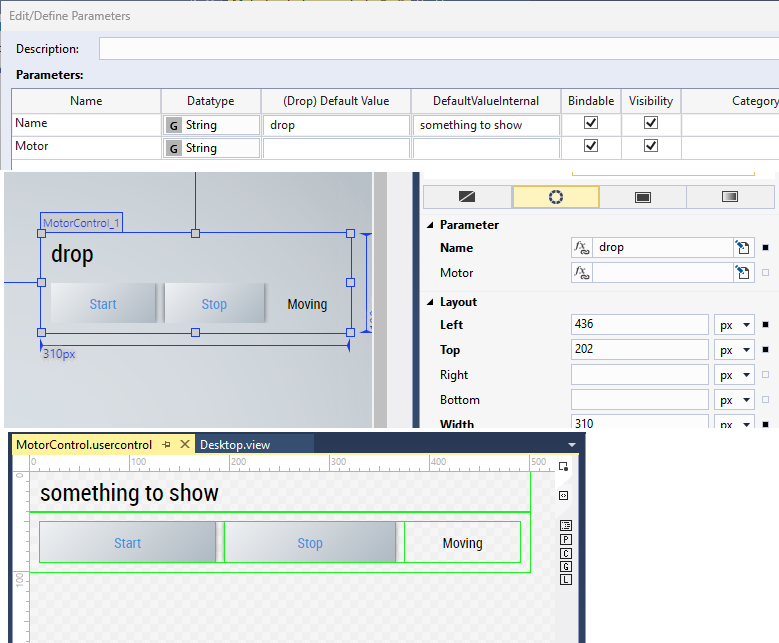
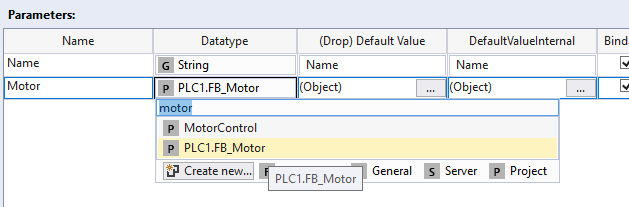
Add parameters like this image bellow. You may see that instead of FB_Motor we have default String as datatype. This is because HMI doesn’t know the FB yet. We will have to add the datatype first.
Add datatype from PLC
Remember that in order for you to be able to add datatypes from PLC or map PLC variables to HMI you have to either have a PLC running and correctly set ADS in HMI Server or have TMC file attached.
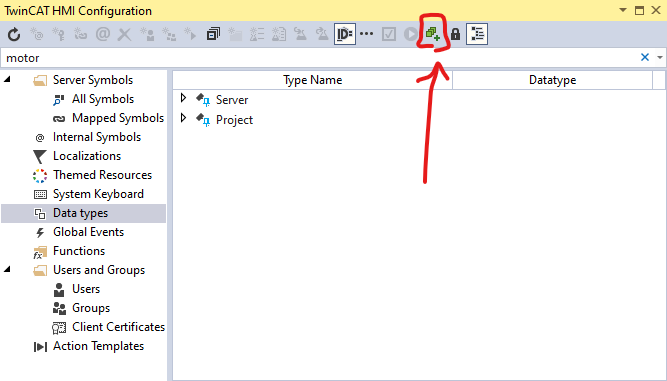
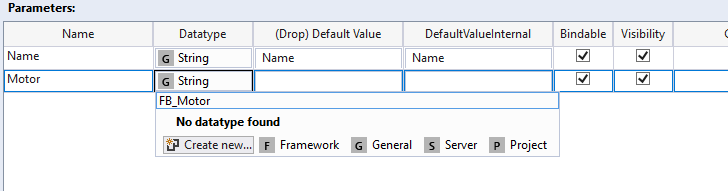
As you can see, we tried to search for our FB, but nothing was found. The datatype addition is easy though. As you are still in the datatype dropdown click Create new… in the lower left corner.
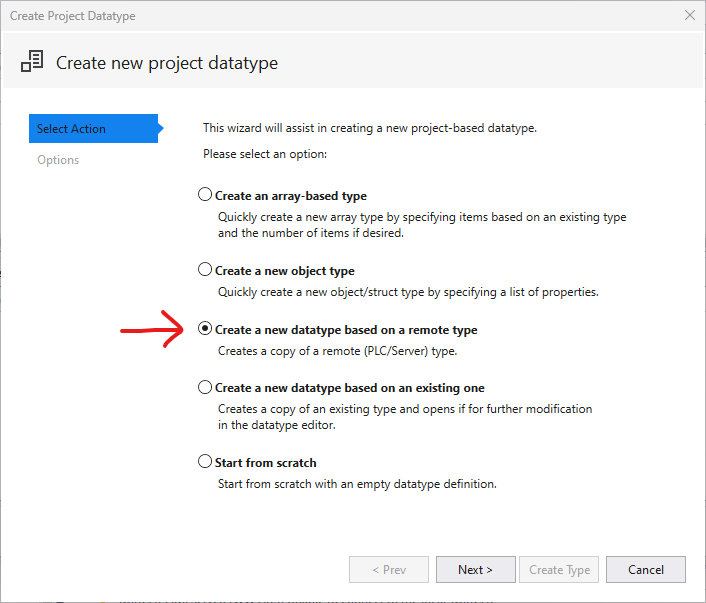
Dialog Create Project Datatype will appear. Select Create a new datatype based on remote type and hit Next.
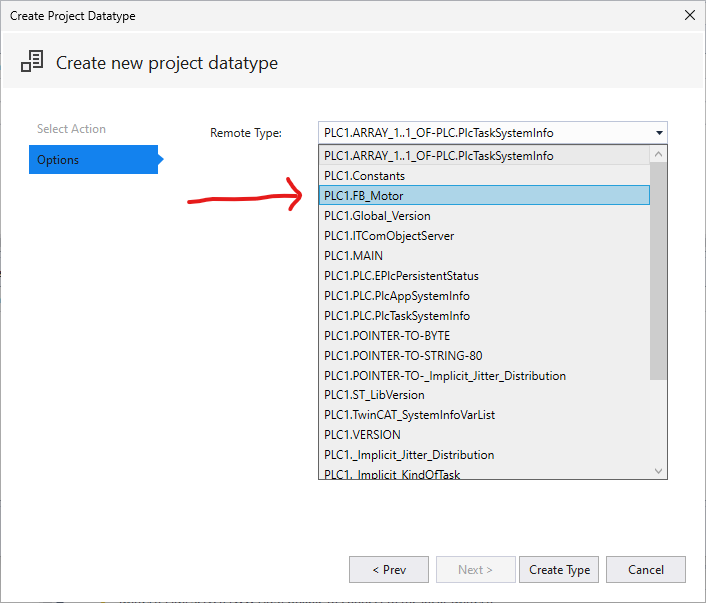
Select our desired FB_Motor as Remote Type and hit Create Type.
Schema editor window will appear. Just click OK here.
Our datatype is now present. But you may need to close and reopen Edit/Define Parameters window to refresh Datatype list. We can now select our FB_Motor as datatype.
We successfully added parameters for our UserControl!
Make UserControl work!
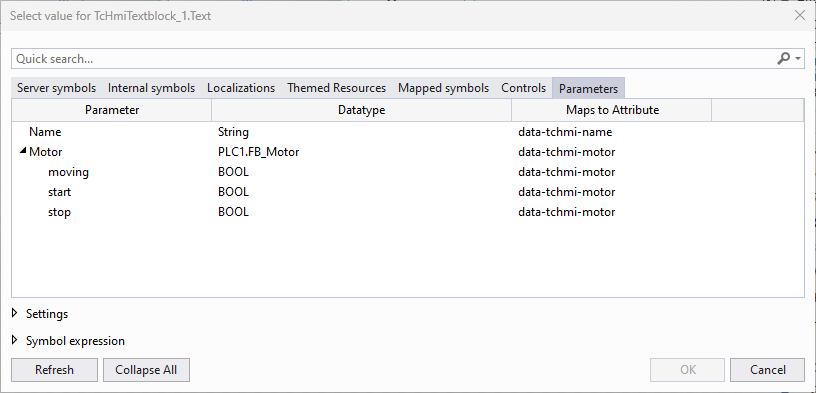
Let’s bind our added parameters. This should not be anything new as you have done this in HMI tutorial. Only difference is that we will not be searching in Server tab but rather in Parameters tab.
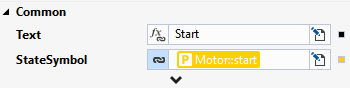
Bind Text parameter of name TextBox to Name parameter.

And start and stop variables as StateSymbol for buttons.
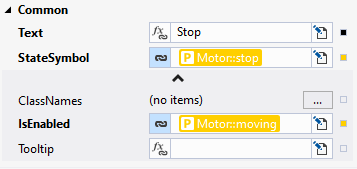
Disable buttons (like interlock)
When the motor is still, let’s block Stop button. It does not make sense to stop motor when it is stop right? And we will do the same thing with the start button. If motor is on, start button cannot be clicked. Let’s thing about it like some interlocking mechanism.
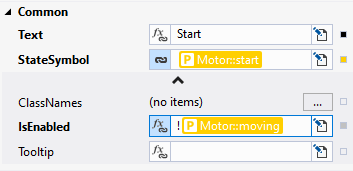
We can achieve this by using IsEnabled parameter of our Buttons (this parameter is present in all controls). It’s hidden in the Common category. We will bind moving to IsEnabled for buttons and negate the expression for the start button only.
Do you remember how in HMI tutorial I have written that all those fields evaluate as JavaScript? We will use this knowledge to negate our symbol. As you know, the negation in Structured Text is done using NOT operator. In JavaScript as well as many other languages this is done using exclamation mark !. So let’s click into the symbol field and write it there. Field will change from Data binding type to Function binding.
That would be for working buttons.
Change status color
But what about that MovingStatus TextBox which is still sitting there doing nothing? We will change it’s color based on status of motor. Whether it is moving or not.
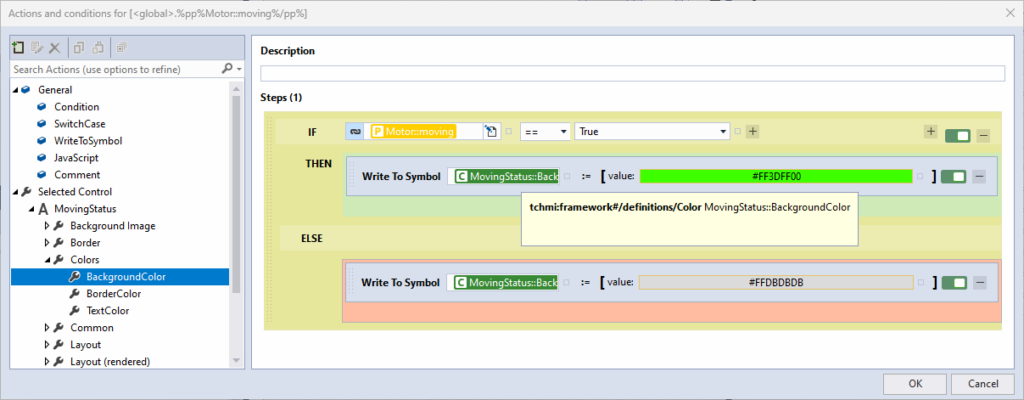
We will use Control events for this. This was also done in the complex tutorial. Select our MovingStatus TextBox and create Custom event for moving symbol.
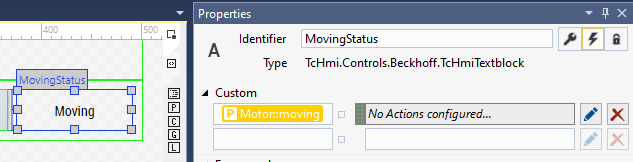
We will create logic that will change background color based on value of moving symbol.
*In some cases you may want to copy your logic into .onAttached event.
It’s that easy! Well it may be actually a bit of work just to create a basic indication element. You can create your custom indication UserControl with infinite customization though.
Our UserControl is good enough for this showcase and thus finished!
Use it!
Let’s place our UserControl on Desktop. Drag it from Toolbox to the Desktop.
Then go to Parameters and give it some name and bind motor server symbol to it.
If you have PLC running, just lunch Live-View a try whether it works!
It looks ugly AF
Yeah! Although what we did works and may explain basics of how to do reusable element it is ugly as hell. If you would like to learn all sorts of possible and impossible ways of styling and theming in TwinCAT HMI just visit my other tutorial focused specially on styling.
Final word
HMI allows for creation of feature rich reusable elements called UserControls.
You can enhance you design game by making use of Container and Grid Controls. Try to play around and find many ways to utilize basic Controls. You will use events a lot.
Leave a Reply