Every machine needs these so called alarms. Some way to tell user when there is something happening with machine. This is usually in a form of alarm table visible on HMI. To do that you need to have a way to somehow raise and clear alarms for many different problems.
For this purpose TwinCAT has an EventLogger. A powerful system of alarms and messages. This post will guide you through creation of these events, working with them in a program and presenting them on both PLC Visualization TF1800 and HMI TF2000.
Prerequisites
- Basic TwinCAT installation
- You know some basic work with TwinCAT
- If you want to try alarm table for TF2000 HMI, you need to have this HMI installed as well
- If you want to try alarm table for TF1800 PLC Visualization, you need to use TwinCAT 4026
What you should expect from this article
- Add your events to the event system
- Basic handling of events in PLC code (create, raise, clear)
- Use arguments in events to show process values
- Show alarm table in old PLC Visualization (TF1800, Codesys one)
- Show alarm table in new TwinCAT HMI (TF2000)
Table of Contents
- Example PLC Code
- Alarm vs Message
- Create Events (Type System)
- PLC Program – Use Events
- How to test without HMI
- Event Table in TwinCAT HMI
- Event Table in PLC Visualization
- Example file
Example PLC Code
To use alarms and messages we need to have something where we can add it and show how to work with it. We will use this simple program:
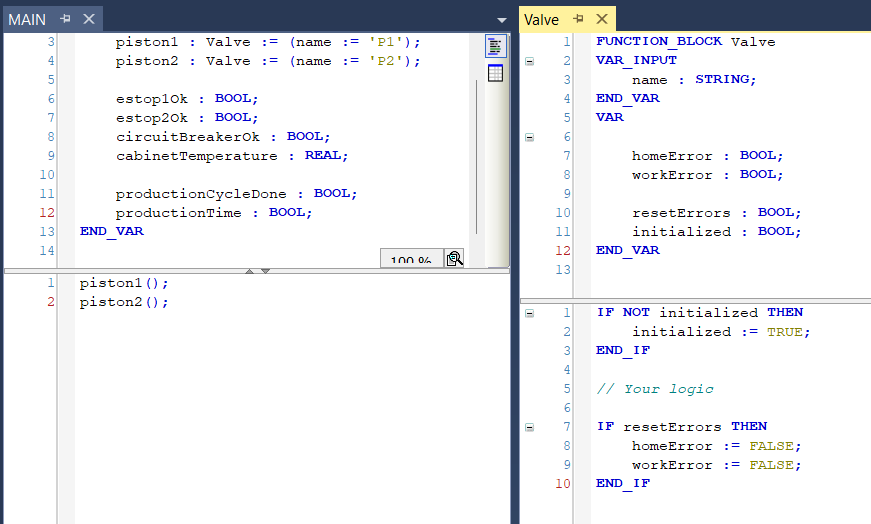
We have Valve FB with basic position errors. Then we have MAIN program with basic diagnostics – estops, cabinet components and with production status.
MAIN
PROGRAM MAIN
VAR
	piston1 : Valve := (name := 'P1');
	piston2 : Valve := (name := 'P2');

	estop1Ok : BOOL;
	estop2Ok : BOOL;
	circuitBreakerOk : BOOL;
	cabinetTemperature : REAL;

	productionCycleDone : BOOL;
	productionTime : TIME;
END_VAR
piston1();
piston2();Valve
FUNCTION_BLOCK Valve
VAR_INPUT
name : STRING;
END_VAR
VAR
homeError : BOOL;
workError : BOOL;
resetErrors : BOOL;
initialized : BOOL;
END_VARIF NOT initialized THEN
initialized := TRUE;
END_IF
IF resetErrors THEN
resetErrors := FALSE;
homeError := FALSE;
workError := FALSE;
END_IF
// Your logicAlarm vs Message
They are both type of EventLogger events. They both can show up in alarms table. And they are both used in a similar way in program. Basically, the only difference is their lifecycle.
Basic alarm usage is to show alarm when there is error, remove alarm when error is reset. Message is more like a log, it gets logged and stays there. Have a look at lifecycle of each event:
| Alarm | Raise -> Confirm (optional) -> Clear |
| Message | Send |
When working with HMIs later in this article, we will use filters to show some common combinations of events:
- Active alarms (raised but not cleared)
- History of alarms and messages (raised and cleared alarms and sent messages)
Alarm Confirmation
In PLC program, you can choose for each alarm instance, whether confirmation is required or not. But what does that mean? Confirmation is an extra step when removing alarm. So when you have an active alarm, you have solved an error and you want to remove it, you need to first confirm the alarm and only after that you can clear it. This is used rather sparsely on projects, you may never need it.
Create Events (Type System)
So let’s sum up here all the events we are going to create:
| Alarm | Home position error |
| Alarm | Work position error |
| Alarm | Estop pressed |
| Alarm | Circuit breaker tripped |
| Alarm | Cabinet temperature too high |
| Message | Errors were reset |
| Message | Production cycle completed in X seconds |
.tmc files
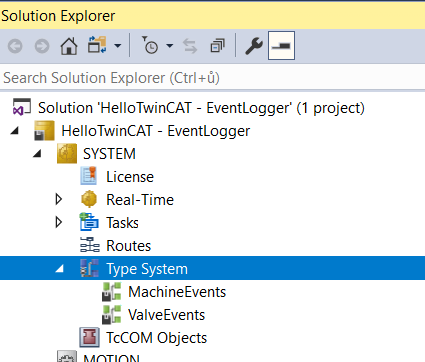
To create events we have to navigate to Solution Explorer -> SYSTEM -> Type System. We will right click on the Type System and add new item. This way we will create tmc files for events for each program unit (FB, PRG) you have.
*You can create only single file for everything or stuff everything straight into Type System, but creating separate files, makes the project and especially git better organized.
Event Classes
Choose one of the new files and double click to open it. Then switch to Event Classes tab.
If you want to edit existing Event Class, you need to right click it and Edit.
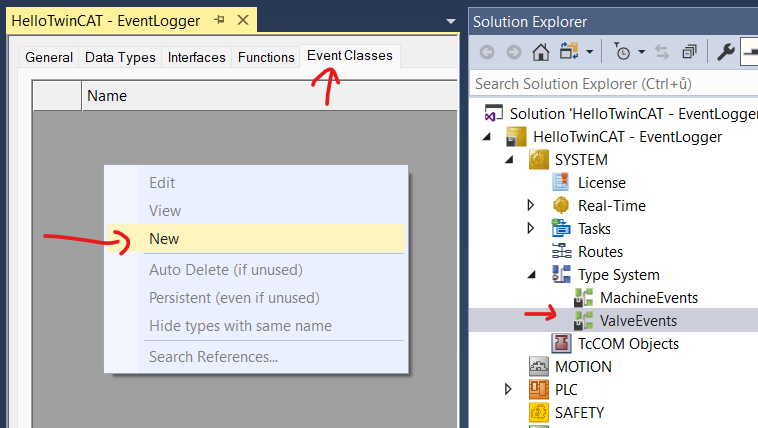
In there, right click into the gray space and choose New to create new Event Class.
Name your event class somehow.
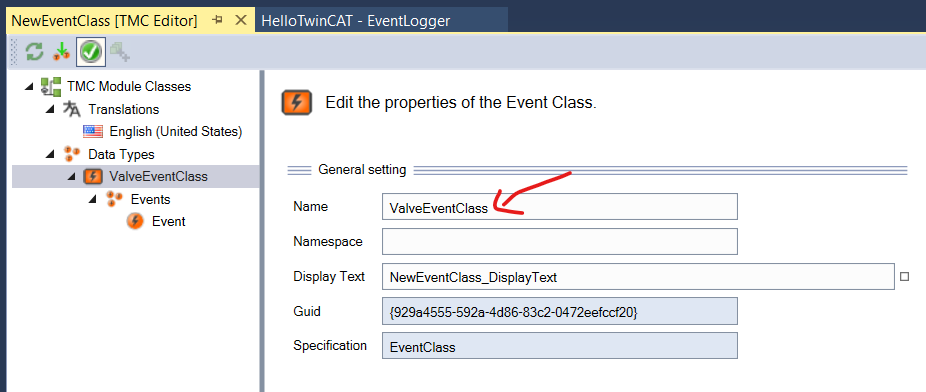
Now we have our event class created. Let’s have a look into the left panel and introduce important items:
- Events: List of all your events in this class
- Translations: Translated texts for your events
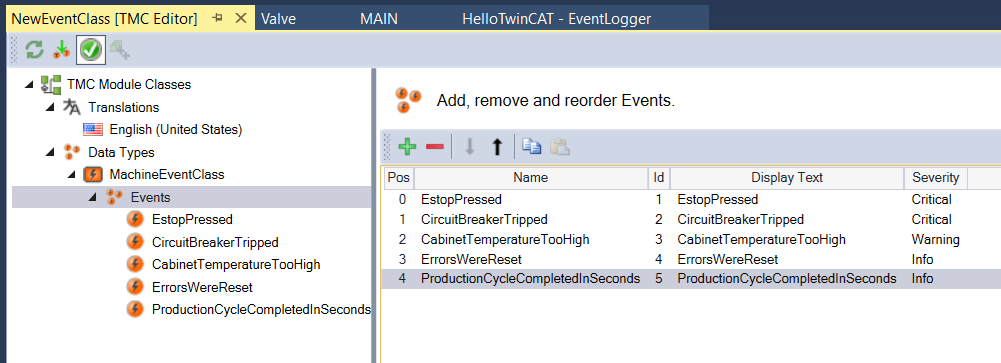
Add Events
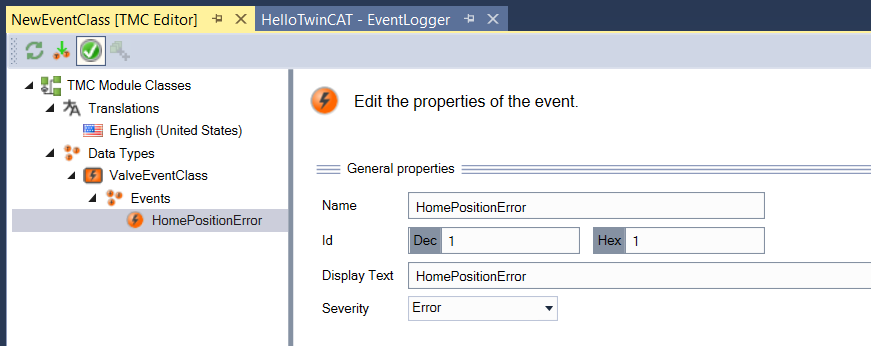
We can now create actual events! We can start by changing the dummy Event to one of yours. Here is the meaning of the fields you need to fill in for each event:
- Name: Name of event. This will be used in PLC code.
- Display Text: Text to display in alarm table on screen. This value will also serve as a key for translations dictionary in the next step so I suggest to copy & paste the Name value into this field.
- Id: Unique number of the event. You dont need to change this.
- Severity: You can define how this message will be serious. You will probably use Critical for safety alarms, Error for error alarms, Warning for alarms that should be checked but won’t stop machine and Information for some log messages.
*There is no difference between Alarm and Message in Event Class editor. Basically you just create texts here. Whether you will use it as Alarm or Message is defined in the code.
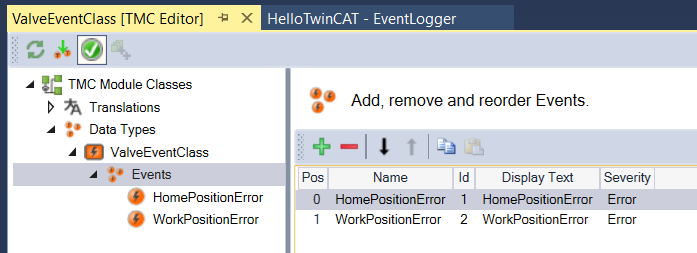
Now go to Events in the left panel and add all of them. I got only 2 for this valve.
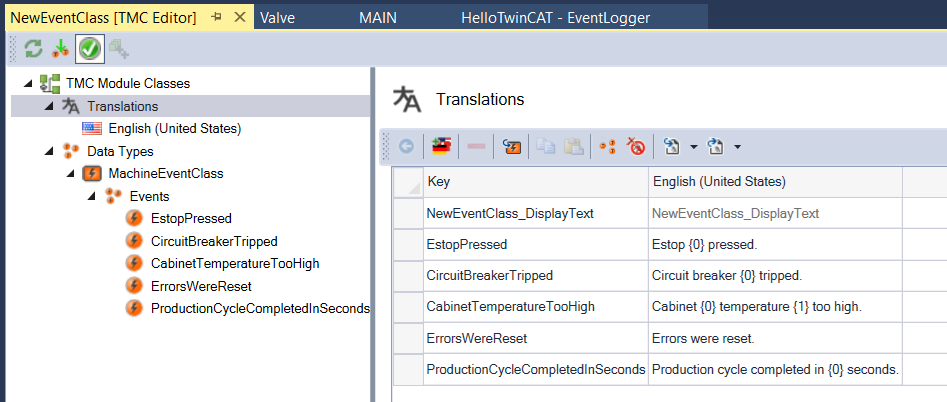
Event Translations
Once we have some events created, we can head to Translations in the left panel. By clicking on the thunderbolt icon marked with (1) in the picture below, you can load all (2) translation keys into the translation table.
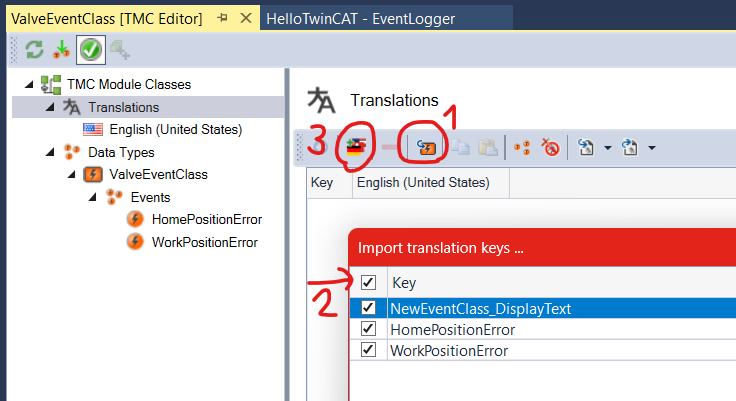
By clicking a flag icon (3) you can add more languages. Added languages will appear as columns in a translations table and in the left panel. You can remove language by deleting it from a left panel.
Let’s now think for a bit. If we would just wrote plain alarm texts here, it would not be reusable for multiple valves right? For this reason, you can pass arguments to events in a program. Arguments are placed into the translations in a {<index of argument>} form. We can use arguments to include valve name into the event so we know exactly where the problem occured:
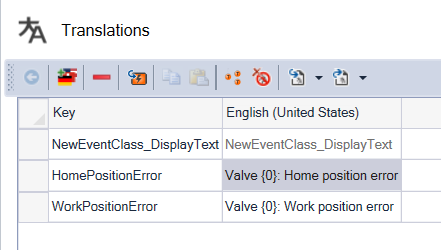
We have now successfully created events for valve and have them prepared to use in PLC program.
Examples of Usage for Translation Placeholders
All the other events from the MAIN PRG are still missing though. We can use them to show multiple variants how placeholders can be used.
You can use them for example to insert process values, names of devices or program units.
PLC Program – Use Events
EventLogger does not require any licence, you just have to add Tc3_EventLogger library to work with it.
To use event in PLC program you need to:
- Create variables of type
FB_TcAlarmorFB_TcMessage. - Set event to these variables using
CreateExorCreateEx2methods. - Handle
FB_TcAlarmevents usingRaise,ConfirmandClearmethods or handleFB_TcMessageusing onlySendmethod. - Both event types also have
ipArgumentsproperty for filling placeholders in event text.
CreateEx Method
CreateEx or CreateEx2 to enable alarm confirmation. You will call this method once at program startup. You can call it somewhere in your init section, or you can call it in FB_init method.
- stEventEntry: This is where you set event you have created in your EventClass. You will access it using
TC_EVENTS.MyEventClass.MyEvent. You can use each created event in any number of instances ofFB_TcAlarmorFB_TcMessage. - bWithConfirmation: Only present in
FB_TcAlarm.CreateExmethod.FB_TcAlarm.CreateEx2will create alarm without confirmation. Set this toTRUEif you want to confirm the alarm before it can be cleared. - ipSourceInfo: Most projects are good with just writing
0in here. Events contain source information (e.g. name of event program instance) in event details. You can provide your own instead of default one. You will probably never use it.
Raise, Clear, Send Methods
Methods to handle lifecycle of event. Raise and Clear will create and remove active alarm. Send method will log a message.
- nTimeStamp: All these methods have this parameter where you can define custom time for this action of the event. About 100 % of time, you just want to write
0in there, which means current time.
You can call Raise method every cycle when there is error and you want alarm to be raised again when user tries to reset it. Just make sure to not also Clear it every cycle as this will spam a lot of events.
Be careful to not raise and immediately clear alarm every cycle. All these will show up in your Error List. You will get thousands of records in Error List in no time and TwinCAT will freeze and you will have to restart PLC.
ipArguments Property
This is where the placeholders in translations are set. This property returns interface that will enable you to set values for the placeholders using methods.
These methods support fluent interface so you can chain them and easily pass all infos into your event texts. This will be visible in example code, but basically fluent interface means you call the methods after each other:
myAlarm.ipArguments.Clear().AddInt(1).AddStringByValue('Text');If you only want to pass a name (or some text that won’t change) into your event, you can do so only once somewhere at program start.
If you want to show alarm with some current process values in case of error (or some other data that can change for each alarm raise), you need to Clear previous values of arguments and pass them all again with new values before you call Raise or Send method.
There are various methods for each datatype to add.
Example Implementation
Let’s implement them alarms in our code.
MAIN
PROGRAM MAIN
VAR
piston1 : Valve := (name := 'P1');
piston2 : Valve := (name := 'P2');
estop1Ok : BOOL;
estop2Ok : BOOL;
circuitBreakerOk : BOOL;
cabinetTemperature : REAL;
productionCycleDone : BOOL;
productionTime : TIME;
resetErrors : BOOL;
initialized : BOOL;
estopPressedAlarm : FB_TcAlarm;
estopMessage : STRING;
circuitBreakerTrippedAlarm : FB_TcAlarm;
cabinetTemperatureTooHighAlarm : FB_TcAlarm;
errorsWereResetMessage : FB_TcMessage;
productionCycleCompletedInSecondsMessage : FB_TcMessage;
END_VARIF NOT initialized THEN
initialized := TRUE;
estopPressedAlarm.CreateEx2(TC_EVENTS.MachineEventClass.EstopPressed, 0);
circuitBreakerTrippedAlarm.CreateEx2(TC_EVENTS.MachineEventClass.CircuitBreakerTripped, 0);
cabinetTemperatureTooHighAlarm.CreateEx2(TC_EVENTS.MachineEventClass.CabinetTemperatureTooHigh, 0);
errorsWereResetMessage.CreateEx(TC_EVENTS.MachineEventClass.ErrorsWereReset, 0);
productionCycleCompletedInSecondsMessage.CreateEx(TC_EVENTS.MachineEventClass.ProductionCycleCompletedInSeconds, 0);
circuitBreakerTrippedAlarm.ipArguments.Clear().AddStringByValue('CB1');
END_IF
IF resetErrors THEN
resetErrors := FALSE;
piston1(resetErrors := TRUE);
piston2(resetErrors := TRUE);
estopPressedAlarm.Clear(0, TRUE);
circuitBreakerTrippedAlarm.Clear(0, TRUE);
cabinetTemperatureTooHighAlarm.Clear(0, TRUE);
END_IF
// Your logic
IF NOT estop1Ok OR NOT estop2Ok THEN
estopPressedAlarm.ipArguments.Clear();
estopMessage := '';
IF NOT estop1Ok THEN
estopMessage := CONCAT(estopMessage, 'ESTOP 1');
END_IF
IF NOT estop2Ok THEN
IF estopMessage <> '' THEN
estopMessage := CONCAT(estopMessage, ', ');
END_IF
estopMessage := CONCAT(estopMessage, 'ESTOP 2');
END_IF
estopPressedAlarm.ipArguments.AddStringByValue(estopMessage);
estopPressedAlarm.Raise(0);
END_IF
IF NOT circuitBreakerOk THEN
circuitBreakerTrippedAlarm.Raise(0);
END_IF
IF cabinetTemperature > 60 THEN // DegC
cabinetTemperatureTooHighAlarm
.ipArguments
.Clear()
.AddStringByValue('CAB1')
.AddReal(cabinetTemperature);
cabinetTemperatureTooHighAlarm.Raise(0);
END_IF
IF productionCycleDone THEN
productionCycleDone := FALSE;
productionCycleCompletedInSecondsMessage
.ipArguments
.Clear()
.AddReal(TO_REAL(productionTime) / 1000);
productionCycleCompletedInSecondsMessage.Send(0);
END_IF
piston1();
piston2();
Valve
FUNCTION_BLOCK Valve
VAR_INPUT
	name : STRING;
	resetErrors : BOOL;
END_VAR
VAR

	homeError : BOOL;
	workError : BOOL;

	initialized : BOOL;

	homeErrorAlarm : FB_TcAlarm;
	workErrorAlarm : FB_TcAlarm;
END_VAR
IF NOT initialized THEN
initialized := TRUE;
homeErrorAlarm.CreateEx2(TC_EVENTS.ValveEventClass.HomePositionError, 0);
workErrorAlarm.CreateEx2(TC_EVENTS.ValveEventClass.WorkPositionError, 0);
homeErrorAlarm.ipArguments.Clear().AddStringByValue(name);
workErrorAlarm.ipArguments.Clear().AddStringByValue(name);
END_IF
IF resetErrors THEN
resetErrors := FALSE;
homeError := FALSE;
workError := FALSE;
homeErrorAlarm.Clear(0, TRUE);
workErrorAlarm.Clear(0, TRUE);
END_IF
// Your logic
IF homeError THEN
homeErrorAlarm.Raise(0);
END_IF
IF workError THEN
workErrorAlarm.Raise(0);
END_IFThis is all we have to do to have alarms and messages in our PLC. We can now test them.
How to test without HMI
Although it is probably more practical to watch alarms straight on HMI, we will have a look at how to see them directly in TwinCAT IDE.
There are two windows where you can see events.
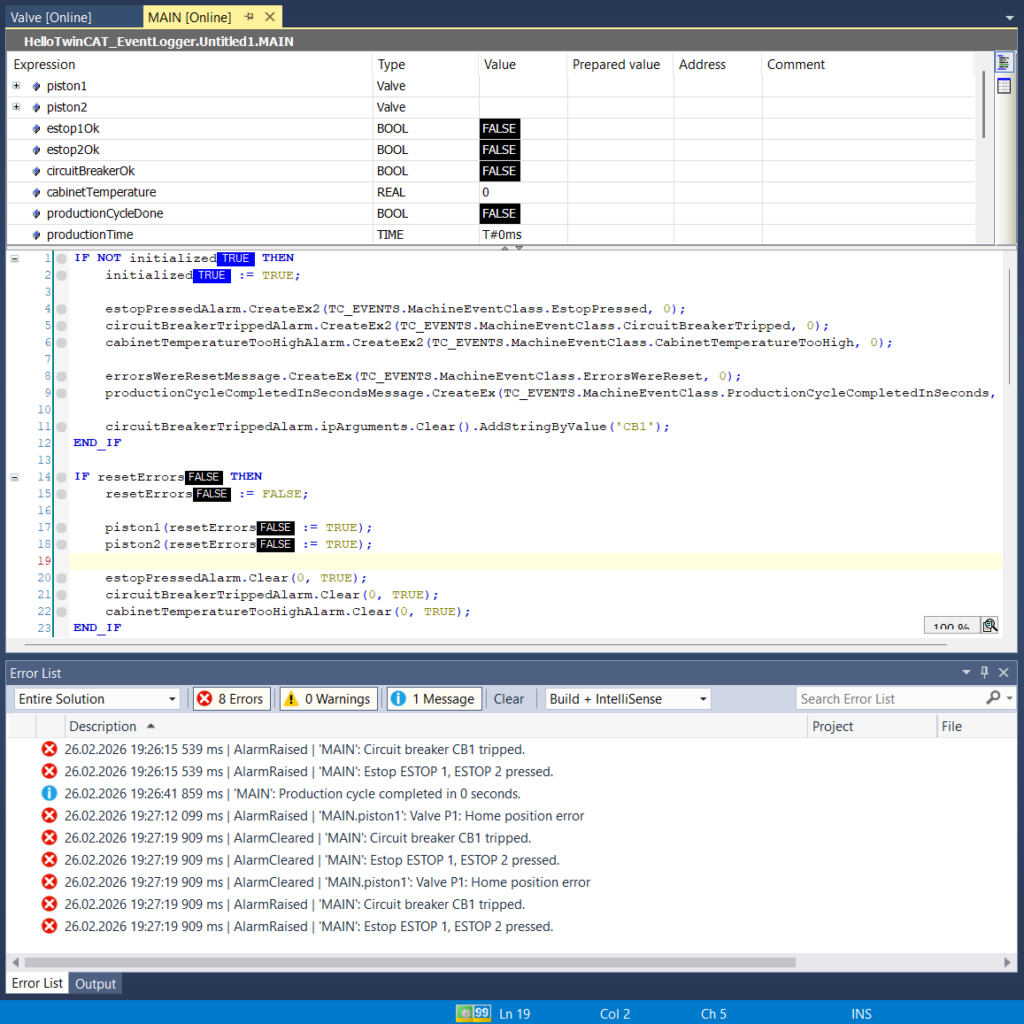
Error List
This is the Error List at the bottom of the TwinCAT IDE. Same window where you can see that you have errors in your program. All the event changes (raise, clear, send) will get logged here.
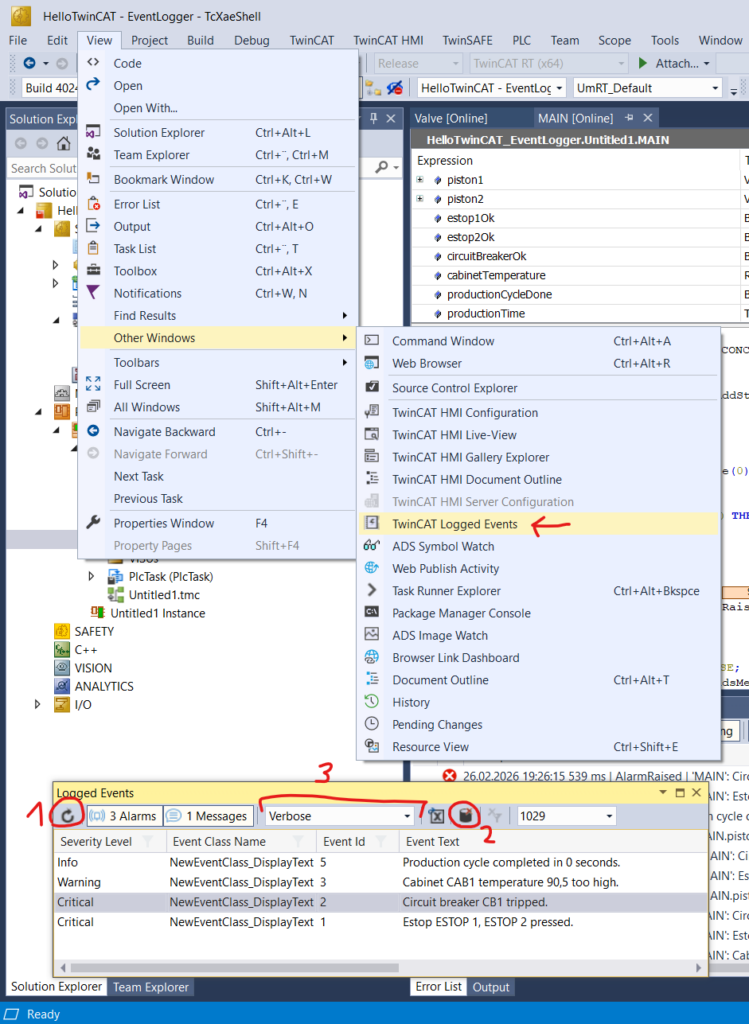
TwinCAT Logged Events Window
Window dedicated to show active alarms.
- You may need to refresh the table to see current events using (1) on the screenshot below.
- You can clear active events using (2).
- You may want to change minimal shown severity (Info, Warning…) to see all your events using (3).
Event Table in TwinCAT HMI
This one will be easier, so let’s starts with new TF2000 TwinCAT HMI.
If you want to learn how to use this HMI, start with ⭐this tutorial⭐.
Install Package
We need to have HMI project.
To get event table we need to install EventLogger package. Head to References and right click on Packages (1), go to Browse tab (2). You may need to swich Package source to TwinCAT HMI repository (3). Finally you have to find the EventLogger package and install it (4).

Configure Connection to PLC
Once you have the package installed, we need to configure it so it can read events from your PLC.
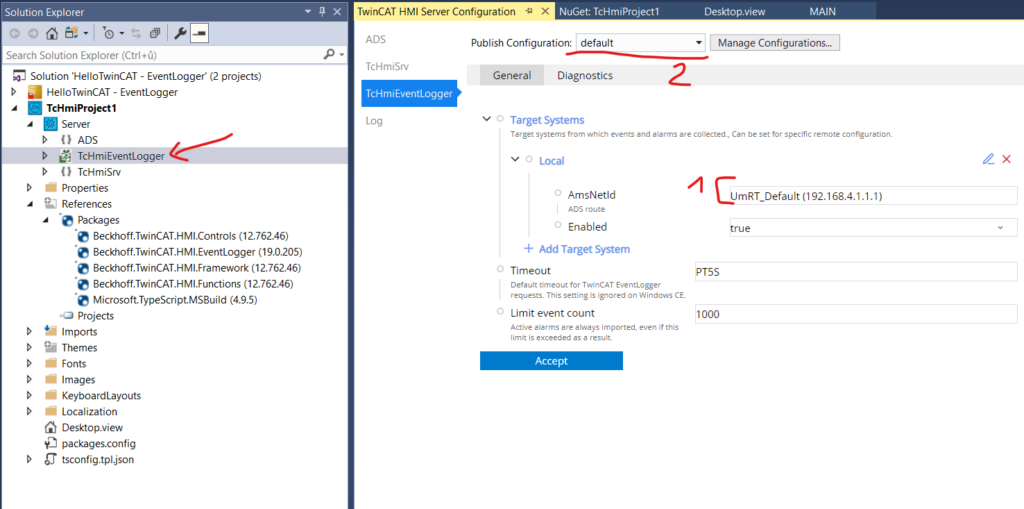
Head to Server and TcHmiEventLogger. You need to select proper AmsNetId of PLC (1). Then accept the changes. Changing default Publish Configuration (2) will enable you to read events in LiveView in editor. You may want to switch Publish Configuration (2) to remote and change the AmsNetId in there as well and accept settings.
Add Event Grid to Screen
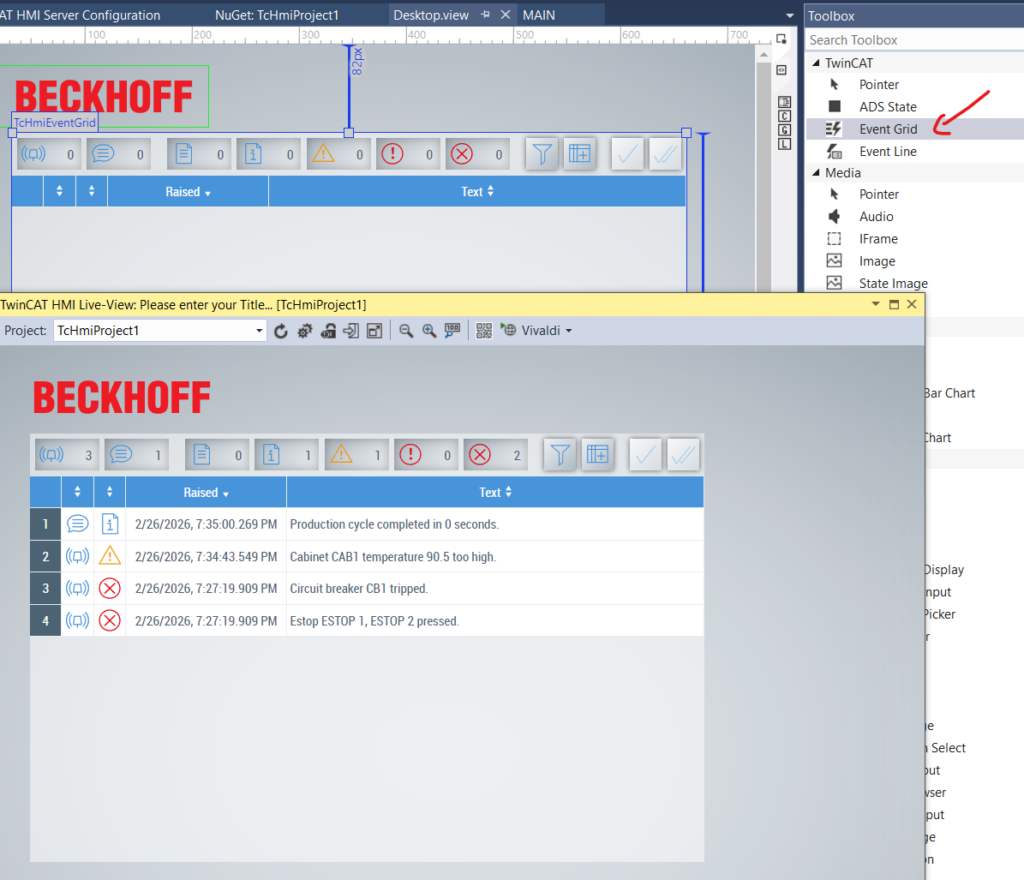
Go to screen where you want to add the event table. You should be able to find Event Grid in Toolbox now. Add it to the screen and that’s it!
Filters – How to Show and Hide History
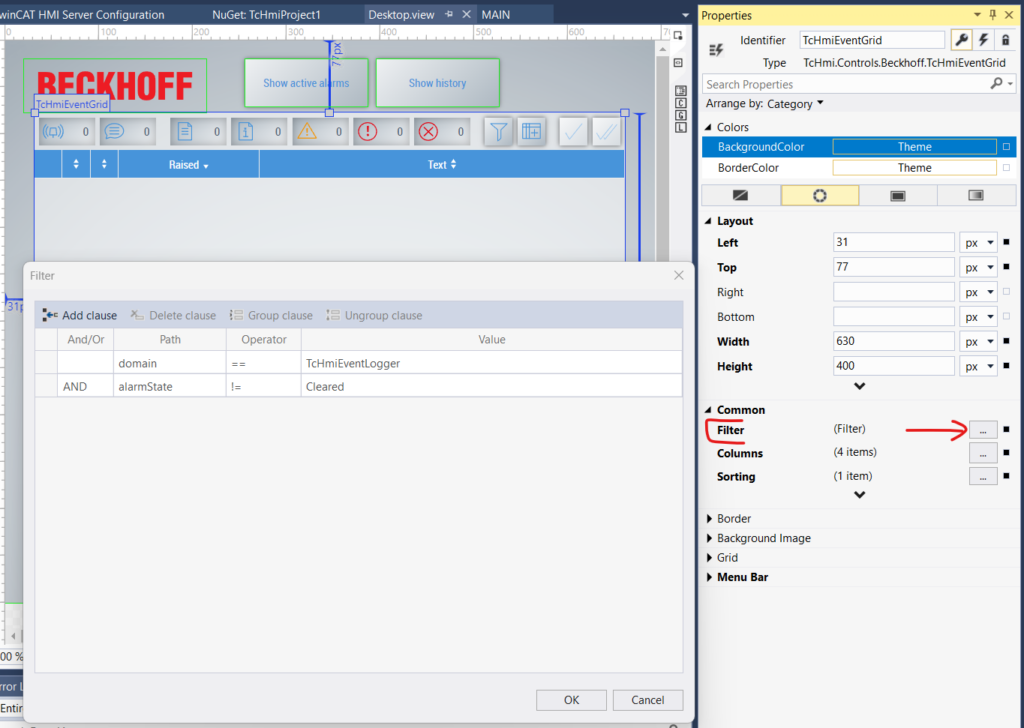
First we will set default filter for the Event Grid to only show active alarms. In Event Grid properties search for Filter and set it to show only events that are from Event Logger and are not cleared.
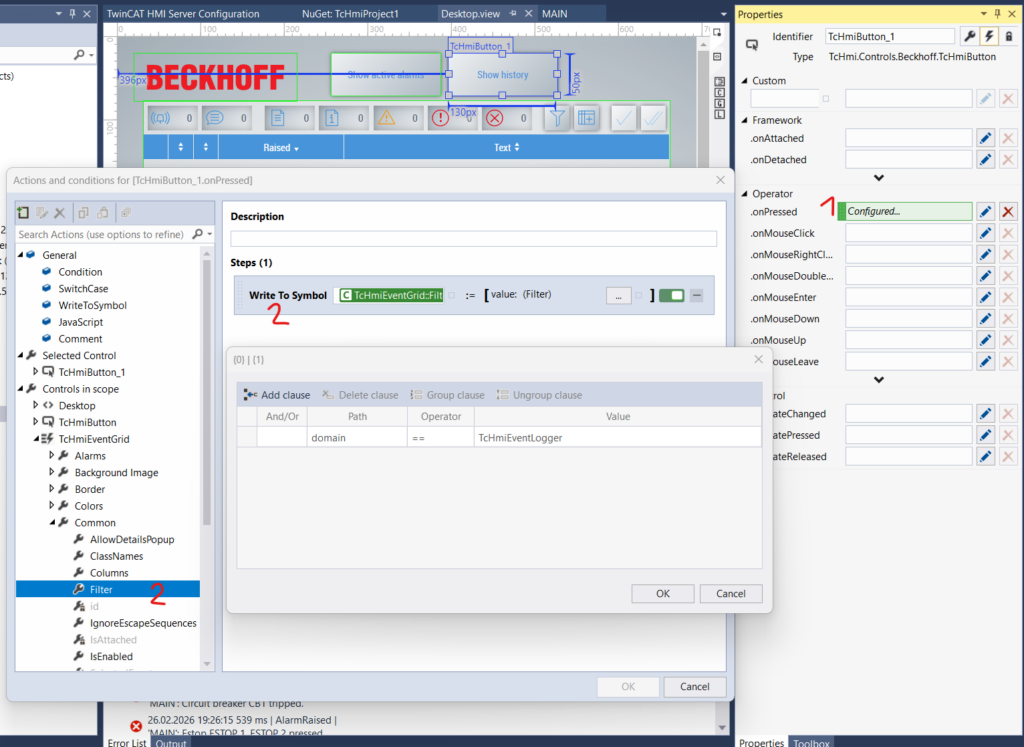
Next we will add two buttons – one to show only active alarms and one to show also cleared alarms and messages. This is shown on the screenshot below. On both buttons we will add .OnPressed event (1) where we will set filter (2) of the Event Grid.
Button to show active alarms will set filter (2) to the same setting we used as default in the screenshot above.
Button to show history will set filter (2) to just show everything from Event Logger.
And this is all you need to show events in the new web HMI.
If you want to learn how you can color Event Grid lines based on event severity, see last chapter “Changing Unchangable” in the HMI styling tutorial.
Event Table in PLC Visualization
There are 2 steps you need to do:
- Read events into some structure in PLC program
- Show that in some table in Visualization
There are 2 ways to do it. The simple way only works in a new TwinCAT 4026 build (that one with package manager). In this tutorial we will only do this simple way with use of FB_ReadTc3Events and built-in event table.
The other way using FB_ListenerBase2 works also in older TwinCAT and is harder to do but also more powerful. There will probably be separate tutorial for it in future.
Read Events using FB_ReadTc3Events
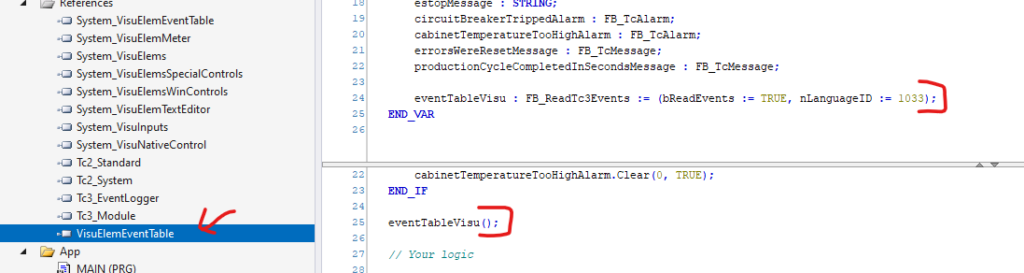
First we need to add library VisuElemEventTable.
Infosys claims this FB should only work when you add TargetVisualization into project. In my case it was working without it as well. Also because this is supposed to be based on FB_EventListenerBase2 it should not be dependent on visualization. That is just in case you want to show events on your custom HMI.
Then we need to declare variable for this FB and call it.
The function block has bReadEvents input. Remember it will only get updates when this input is TRUE. Alarms raised before it is called with bReadEvent := TRUE will not show up in output table. So you should call it somewhere at the start of your program. Before any event is raised/sent.
Next thing you will want to set is nLanguageID input. Here you will write id of language you choose when creating events in event class. Usually these are LCID codes. For english you will probably choose 1033.
Now you should be able to receive events. You can check outputs of the FB online.
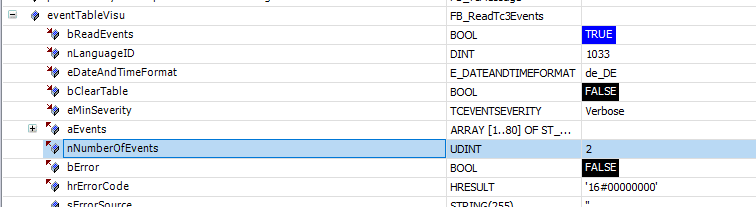
You can use bClearTable input to clear events that are no longer active from table.
eventTableVisu : FB_ReadTc3Events := (bReadEvents := TRUE, nLanguageID := 1033);eventTableVisu();Show Table in Visualization
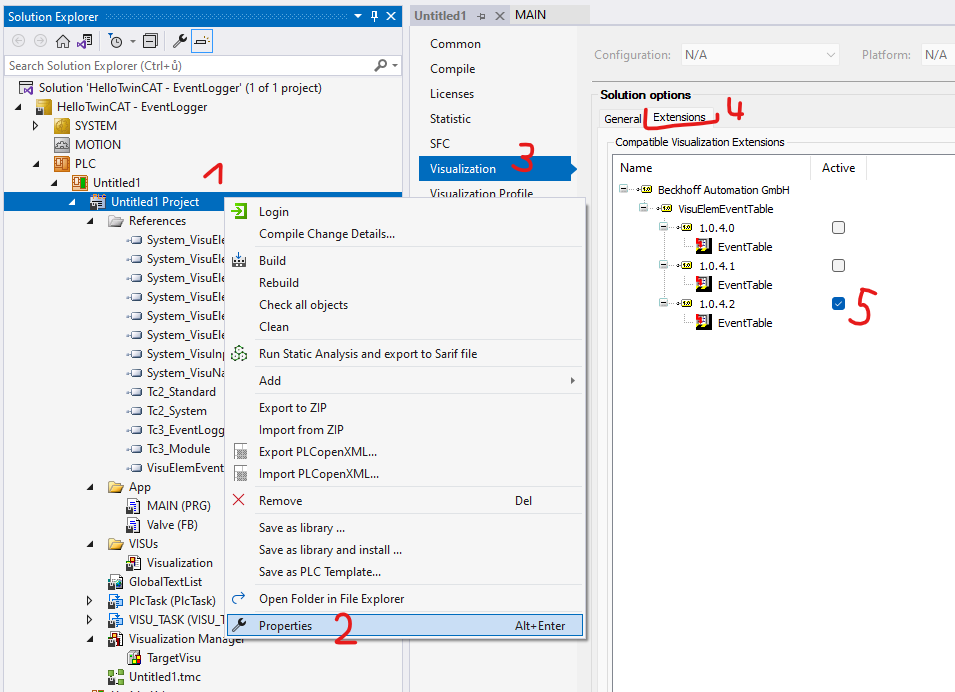
To get access to ready to use event table we need to enable it in project. It is weird but let’s just go along.
Go to the PLC project (1) Properties (2) -> Visualization (3) -> Extensions (4) and enable (5) EventTable. If there are multiple versions I guess it should match version of VisuElemEventTable library.
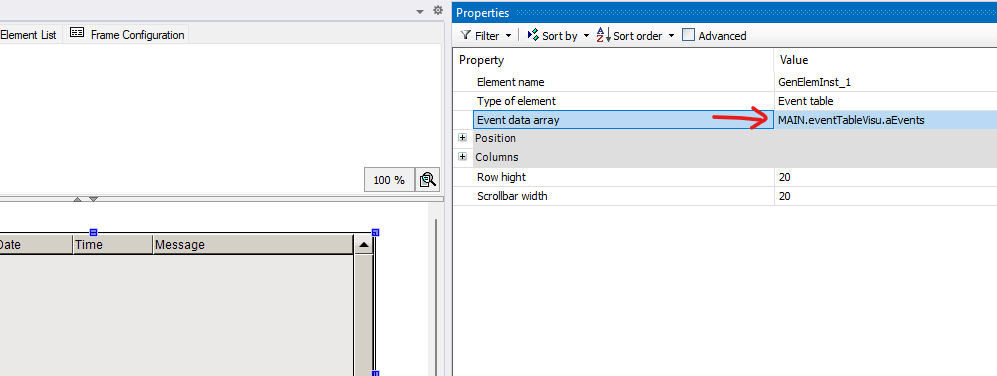
Now you can go to Visualization and you will find the table in Special Controls category.
Last step you need to map the output table of FB_ReadTc3Events into inserted event table.
You may need to add TargetVisu into Visualization Manager to be able to see the visu online.
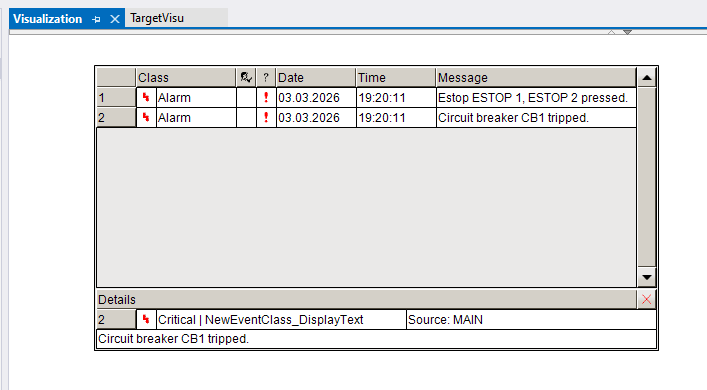
You can click event to see details in lower fields.
Voila! You are done!
Leave a Reply